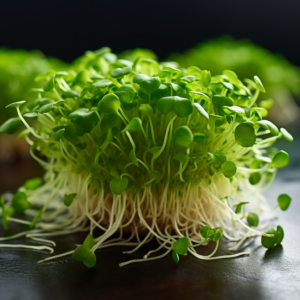

How to grow microgreens hydroponically
If you’re looking for a clean and easy way to grow your own microgreens, then hydroponic growing might be just what you need. In this article, you’ll find step-by-step instructions on how to grow microgreens hydroponically. All you’ll need is a tray without holes and a hydroponic mat, which can be easily obtained online or at your local gardening store. Once you’ve got your supplies, it’s simply a matter of spreading the seeds evenly over the mat, misting them with water, and keeping the tray covered in a room-temperature area. With a little bit of daily misting and exposure to light once the sprouts have taken root, you’ll soon have a bountiful harvest of fresh microgreens at your fingertips. So, let’s get started and bring some green goodness into your home!
Choosing the Right Equipment
Selecting a Tray Without Holes
When it comes to growing microgreens hydroponically, choosing the right equipment is crucial. To start, you will need to select a tray without holes. This is because hydroponic growing relies on a water-based nutrient solution, and having a tray without holes helps to maintain the necessary moisture levels for the microgreens to thrive. You can find trays specifically designed for hydroponic growing at your local gardening store or online.
Using a Hydroponic Mat
In addition to a tray without holes, it is recommended to use a hydroponic mat for growing your microgreens. A hydroponic mat is a specially designed mat that absorbs and holds the water-based nutrient solution, providing a moist environment for the microgreens to grow. It also helps to support the roots of the plants as they develop. When choosing a hydroponic mat, make sure it is made from a material that is safe for growing food and has good water retention capabilities.
Preparing the Hydroponic System
Cleaning the Tray and Mat
Before starting the hydroponic growing process, it is important to clean the tray and mat properly. This helps to prevent the growth of any unwanted bacteria or fungi that could harm the microgreens. Start by rinsing the tray and mat with clean water. Then, use a mild soap or a diluted bleach solution to thoroughly clean them. Make sure to rinse off any soap or bleach residue before proceeding to the next step. Once cleaned, allow the tray and mat to air-dry completely before use.
Soaking the Hydroponic Mat
After cleaning the tray and mat, it is time to prepare them for planting the microgreen seeds. Begin by soaking the hydroponic mat in water for about 10 to 15 minutes. This helps to ensure that the mat is fully saturated and ready to provide the necessary moisture to the seeds and seedlings. Once soaked, gently squeeze out any excess water from the mat, ensuring it is damp but not dripping wet.
Sowing the Seeds
Spreading the Seeds Evenly
Now that your tray and mat are prepared, it is time to sow the microgreen seeds. Start by spreading the seeds evenly over the surface of the hydroponic mat. It is important to ensure that the seeds are distributed uniformly to promote even growth and prevent overcrowding. Use your fingers or a small spoon to gently press the seeds into the mat, making sure they are in contact with the moist surface.
Misting the Seeds with Water
After sowing the seeds, it is necessary to mist them with water. Fill a spray bottle with clean water and mist the seeds lightly, ensuring that they are moistened but not soaked. Misting the seeds helps to initiate the germination process and provides the necessary hydration for the seeds to sprout. Be careful not to overwater the seeds, as excessive moisture can lead to fungal growth and other issues.
Maintaining the Growing Environment
Covering the Tray
To create an ideal growing environment for your microgreens, it is recommended to cover the tray. This helps to retain moisture, create a humid environment, and protect the seeds from light until they germinate. You can use a clear plastic lid or a plastic wrap to cover the tray. Make sure the cover is secure but allows for some airflow. This cover should remain in place until the seeds have germinated and the sprouts are visible.
Placing the Tray at Room Temperature
During the germination and early growth stages, it is important to provide a stable and suitable temperature for your microgreens. Place the covered tray in an area of your home or growing space where the temperature remains around room temperature, typically between 65°F and 75°F (18°C and 24°C). Avoid placing the tray in direct sunlight or in areas with extreme temperature fluctuations. Consistency in temperature helps to promote healthy and robust growth.
Misting and Watering
Misting the Tray
As your microgreens continue to grow, it is essential to mist the tray to maintain proper moisture levels. Using your spray bottle filled with clean water, mist the tray 1-2 times a day. The misting should be done lightly, ensuring that the microgreens receive moisture without becoming waterlogged. The misting helps to keep the hydroponic mat and the developing microgreens hydrated and supports their growth.
Determining Watering Needs
In addition to misting, it is important to monitor and adjust the watering of the microgreens as needed. The water needs of the microgreens may vary depending on factors such as temperature, humidity, and the growth stage of the plants. To determine if watering is necessary, gently touch the hydroponic mat with your fingertip. If it feels dry, it may be a sign that the microgreens need watering. However, it is essential to avoid overwatering, as it can lead to root rot and other issues.
Promoting Root Growth
Exposing the Tray to Light
Once your microgreens have developed their first set of leaves, it is time to promote root growth by exposing them to light. Place the uncovered tray in a well-lit area, such as near a window or under a grow light, where the microgreens can receive 12-16 hours of light each day. Light is essential for the photosynthesis process, which enables the microgreens to convert light energy into chemical energy and promote healthy root and leaf development. Monitor the microgreens closely during this period to ensure they are not exposed to excessive heat or light intensity.
Monitoring the Progress
Observing the First Leaves
As your microgreens continue to grow, it is important to monitor their progress closely. The first leaves, known as cotyledons, will start to appear after a few days. These initial leaves are usually different from the true leaves that will develop later. Once you start seeing the cotyledons, it is an indication that the microgreens are in good health and growing well. Take note of any unusual changes in color, texture, or growth patterns, as they may signal nutrient deficiencies, pest issues, or environmental problems.
Regularly Checking Water Levels
Alongside monitoring the growth and health of your microgreens, it is necessary to regularly check the water levels in the tray. As the plants grow and transpire, the water in the hydroponic mat will gradually decrease. Keep an eye on the moisture levels and adjust the misting and watering accordingly to ensure the microgreens receive adequate hydration. It is better to provide water in smaller amounts more frequently than to flood the tray with excess water.
Harvesting the Microgreens
Determining Harvesting Time
The harvesting time of microgreens can vary depending on the seed variety and personal preference. Generally, microgreens are ready to harvest when the true leaves have fully developed, usually 7-14 days after germination. At this stage, the microgreens will have reached an optimal size and flavor. However, keep in mind that some microgreens may require longer growing times. Taste test a few leaves to determine if they have the desired flavor and texture before proceeding with the harvest.
Cutting the Microgreens
To harvest your microgreens, carefully cut them just above the soil or hydroponic mat using a clean pair of scissors or a sharp knife. Aim to cut the microgreens about ¼ to ½ inch above the surface, allowing for any residual growth that may occur after the initial cut. Take care not to damage the developing plants that surround the harvested microgreens. Once harvested, gently rinse the microgreens with cool water, pat them dry, and they are ready to be enjoyed in your favorite dishes.
Caring for the Hydroponic System
Cleaning and Disinfecting the Tray and Mat
After harvesting your microgreens, it is important to clean and disinfect the tray and mat to prevent the buildup of bacteria and fungi. Start by removing any leftover plant material from the tray and mat. Rinse them thoroughly with water to remove any debris. Then, use a mild soap or a diluted bleach solution to clean the tray and mat. Pay attention to any hard-to-reach areas and ensure all surfaces are clean. Rinse off any remaining soap or bleach residue and allow the tray and mat to air-dry before storing.
Restarting the Process
With the hydroponic system cleaned and sterilized, you are ready to start the growing process again. Repeat the steps outlined in this article, from choosing the right equipment to sowing the seeds, to ensure continued success with your homegrown microgreens. Remember to adjust the misting and watering as needed, monitor the progress of your microgreens, and provide them with adequate light and care to promote healthy growth.
Conclusion
Growing microgreens hydroponically can be a rewarding and enjoyable experience. By following the steps outlined in this article, you can successfully cultivate nutritious and flavorful microgreens right in your own home. Remember to choose the right equipment, prepare your hydroponic system properly, sow the seeds evenly, and provide the optimal growing conditions for your microgreens. With patience and care, you will be able to harvest and enjoy your homegrown microgreens in no time. Happy growing!